Using Git with Arduino projects
Why Use GitHub with Arduino?
Even for single-person projects, using Git and GitHub brings significant benefits:
- Version Control – Roll back to earlier code versions when bugs appear.
- Backup – Cloud storage ensures you don’t lose your work.
- Collaboration – Easily share and collaborate with others.
- Traceability – Track when and why changes were made.
- Documentation – Use README.md and issues for project context.
- Publishing – Share open-source libraries, projects, or inspiration with the world.
Prerequisites
-
A working Arduino project folder, e.g., Documents/Arduino/exampleProject.
-
Git installed on your system.→ Download Git
-
A GitHub account.→ Sign up for GitHub
-
(Optional) GitHub Desktop or familiarity with CLI commands.
Step-by-Step: Use GitHub with an Existing Arduino Project
Step 1: Navigate to Your Arduino Project Folder
- Open File Explorer (or terminal) to locate your project folder, e.g.:
Documents/Arduino/exampleProject/
Step 2: Initialize Git
- Open a terminal (e.g., Git Bash, Terminal, or CMD on Windows).
- Navigate to your project folder:
cd ~/Documents/Arduino/exampleProject
git init

- This creates a .git folder, turning your sketch folder into a Git repository.
Step 3: Check What Will Be Tracked
- Run the following command:
git status
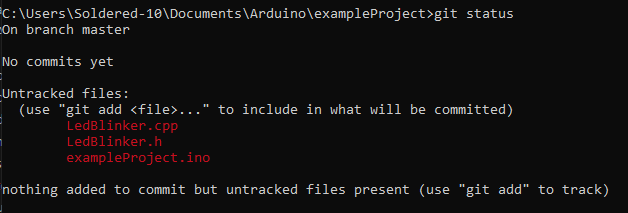
- You’ll see all files in the folder marked as untracked (e.g., .ino, .cpp, .h, etc.).
Step 4: Add a .gitignore File (Optional)
Some files don’t belong in Git (like compiled binaries or temporary files). Create a .gitignore file in the root of your project folder.
Example .gitignore:
# Arduino build files
*.hex
*.elf
*.bin

# Mac and VSCode files
.DS_Store
.vscode/

# Temporary files
*.tmp
Step 5: Make the First Commit
- Add all files to the repository:
git add .
- Save a snapshot of the project:
git commit -m "Initial commit – exampleProject"

Step 6: Create a New GitHub Repository
- Go to GitHub and log in.
- Click New repository.
- Name it (e.g., exampleProject).
- Choose Private or Public visibility.
- Don’t initialize with a README — you already have code.
- Click Create repository.
GitHub will show instructions for pushing an existing repo.
Step 7: Link Local Repo to GitHub
- In the terminal (in your project folder), run:
git remote add origin https://github.com/YOUR_USERNAME/exampleProject.git
git branch -M main
git push -u origin main

- Your local Arduino project is now published on GitHub!
Optional: Add README and LICENSE
Create README.md:
# exampleProject

An Arduino project demonstrating a reusable LED blinker class.
Add LICENSE:
For open-source projects, consider MIT or GPL licenses:
-
Create a LICENSE file locally or via GitHub’s web UI.
-
Include license details to clarify usage rights.
Typical Workflow Going Forward
# Make changes in VSCode or Arduino IDE.
# Then commit & push:
git add .
git commit -m "Describe what you changed"
git push
If collaborating with others, always run git pull before starting work.
Bonus: Clone the Repo on Another Machine
On a new computer or fresh environment:
git clone https://github.com/YOUR_USERNAME/exampleProject.git
Open the cloned folder in Arduino IDE or VSCode and continue development seamlessly.