Inputronic Keyboard - Reading key events
Connections for this example
Connect the Inputronic Keyboard to your microcontroller via Qwiic/easyC cable or I²C pins as shown in the Getting Started guide.
Initialization
To use the Inputronic Keyboard, first include the required library, create the keyboard object, and initialize it in the setup() function.
#include "SOLDERED-Inputronic-Keyboard.h"

InputronicKeyboard kbd;

void setup(){
    Serial.begin(115200);
    if(kbd.begin()){
        Serial.println("Keyboard initialized successfully!");
    }
    else{
        Serial.println("Keyboard not found. Check connection.");
        while(1);
    }
}
kbd.begin()
Initializes the TCA8418 keypad controller, configuring the 8×10 matrix and I²C communication
Returns value: Boolean value. True if the keyboard was successfully initialized, False otherwise.
Reading Key Events
The keyboard uses a 10-event FIFO to store key presses and releases. To read events, first check if any are available, then read and decode them.
void loop(){
    while(kbd.eventsAvailable() > 0){
        bool isRelease = false;
        uint8_t row = 0, col = 0;
        const char *label = nullptr;

        if(kbd.readMappedEvent(isRelease, row, col, label)){
            if(!isRelease && label){  // Only process key presses
                Serial.print("Key pressed: ");
                Serial.print(label);
                Serial.print(" (Row: ");
                Serial.print(row);
                Serial.print(", Col: ");
                Serial.print(col);
                Serial.println(")");
            }
        }
    }
    delay(1);
}
kbd.eventsAvailable()
Returns the number of pending events in the FIFO
Returns value: Integer value representing the number of events (0-15)
kbd.readMappedEvent(isRelease, row, col, label)
Reads one event from the FIFO and decodes it into row, column, and human-readable label
Returns value: Boolean value. True if an event was successfully read and decoded.
Function parameters:
| Type | Name | Description |
|---|---|---|
bool& | isRelease | Output: true if the event is a key release, false if press |
uint8_t& | row | Output: matrix row (0-7) |
uint8_t& | col | Output: matrix column (0-9) |
const char*& | label | Output: pointer to key label string (e.g., 'A', 'ENTER', 'SHIFT') |
Converting Labels to Characters
For printable keys, you can convert the label to a character. The library automatically handles SHIFT and CAPS behavior.
void loop(){
    while(kbd.eventsAvailable() > 0){
        bool isRelease = false;
        uint8_t row = 0, col = 0;
        const char *label = nullptr;

        if(kbd.readMappedEvent(isRelease, row, col, label)){
            if(!isRelease && label){
                char ch;
                if(kbd.labelToChar(label, ch, true)){  // true = apply SHIFT
                    Serial.print("Character: ");
                    Serial.println(ch);
                }
            }
        }
    }
    delay(1);
}
kbd.labelToChar(label, ch, applyShift)
Converts a single-character label to a printable character. Automatically applies SHIFT and CAPS logic.
Returns value: Boolean value. True if the label is a printable character.
Function parameters:
| Type | Name | Description |
|---|---|---|
const char* | label | Input: key label from keymap |
char& | ch | Output: resulting character |
bool | applyShift | Whether to apply SHIFT transformations (default: true) |
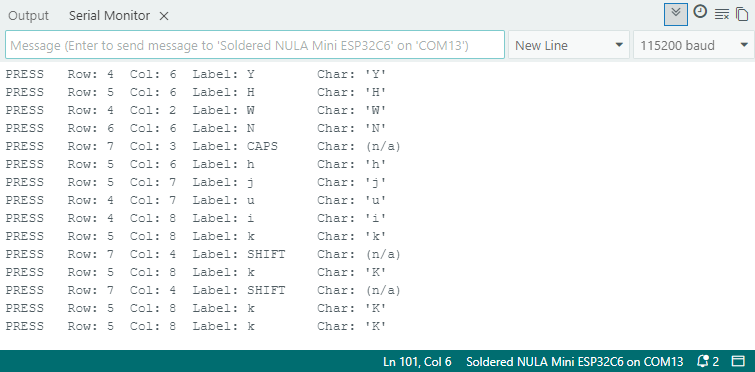
Full Example
KeyboardPoll
Polls the keyboard for key events and prints each key press with its label, row, and column to the Serial Monitor.