Sensor Configuration
This page contains an example showing how to configure and interact with the TMP117 sensor using a simple command interpreter.
It demonstrates how to:
- read temperature
- read the EEPROM NIST UUID
- apply an offset or calibration function
Sensor Configurator
In this example, the loop() function listens for user commands via the Serial Monitor and executes corresponding actions such as temperature reading or calibration.
The supported commands are:
| Command | Parameter | Description |
|---|---|---|
0 | X | Print the actual temperature in °C |
1 | X | Read and print the EEPROM NIST UUID (E1, E2, E3) |
2 | float | Set temperature offset, e.g. 2 20.5 sets offset to 20.5 °C |
3 | float | Calibrate sensor to target temperature, e.g. 3 30.5 calibrates to 30.5 °C |
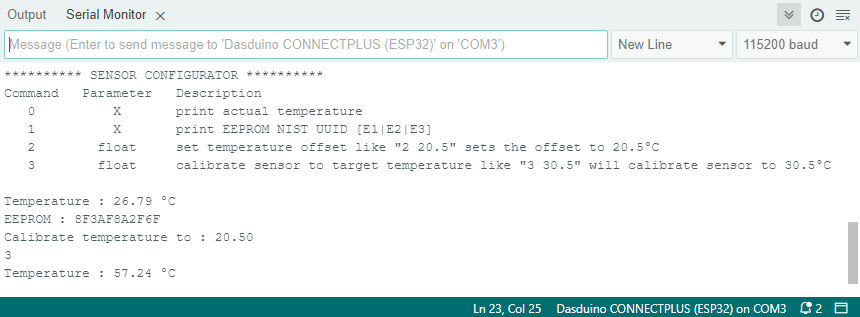
Open the Serial Monitor at 115200 baud to send commands and observe the results.
#include "Soldered-TMP117.h"

#define ALERT_PIN               26
#define LOW_TEMPERATURE_ALERT   20
#define HIGH_TEMPERATURE_ALERT  28

bool alert_flag = false;
Soldered_TMP117 tmp;
float floatnr = 0;

void setup() {
  Wire.begin();
  Serial.begin(115200);

  tmp.init(NULL);
  tmp.setConvMode(TMP117_CMODE::CONTINUOUS);
  tmp.setConvTime(TMP117_CONVT::C15mS5);
  tmp.setAveraging(TMP117_AVE::NOAVE);

  Serial.println("********** SENSOR CONFIGURATOR **********");
  Serial.println(
    "Command   Parameter   Description \n"
    "   0          X       print actual temperature \n"
    "   1          X       print EEPROM NIST UUID [E1|E2|E3] \n"
    "   2        float     set temperature offset like \"2 20.5\" sets the offset to 20.5°C \n"
    "   3        float     calibrate sensor to target temperature like \"3 30.5\" \n"
  );
}

void loop() {
  tmp.update();

  if (Serial.available() > 0) {
    int inByte = Serial.read();

    switch (inByte) {
      case '0':
        Serial.print("Temperature : ");
        Serial.print(tmp.getTemperature());
        Serial.println(" °C");
        break;
      case '1':
        Serial.print("EEPROM : ");
        Serial.print(tmp.readEEPROM(1), HEX);
        Serial.print(tmp.readEEPROM(2), HEX);
        Serial.println(tmp.readEEPROM(3), HEX);
        break;
      case '2':
        floatnr = Serial.parseFloat();
        tmp.setTargetTemperature(floatnr);
        Serial.print("Calibrate temperature to : ");
        Serial.println(floatnr);
        break;
      case '3':
        floatnr = Serial.parseFloat();
        tmp.setOffsetTemperature(floatnr);
        Serial.print("Offset temperature set to : ");
        Serial.println(floatnr);
        break;
      default:
        break;
    }
  }
}
Function reference
tmp.init(void (*newDataCallback) = nullptr)
Initializes the TMP117 driver and optionally registers a callback for new data events. Must be called before other functions.
Returns value: bool, true if the sensor was successfully initialized
tmp.update()
Updates the sensor status, checks for new data, and refreshes internal values. Should be called regularly inside loop().
Returns value: None
tmp.getTemperature()
Reads the most recent temperature measurement from the TMP117.
Returns value: float, Temperature in °C
tmp.readEEPROM(uint8_t index)
Reads one of the device’s EEPROM words (e.g., NIST UUID data). Common indices: 1–3.
Returns value: uint16_t, Raw 16-bit EEPROM value
tmp.setConvMode(TMP117_CMODE mode)
Sets the sensor’s conversion mode. CONTINUOUS keeps measuring, ONESHOT performs one measurement, and SHUTDOWN disables conversions to save power.
Returns value: None
tmp.setConvTime(TMP117_CONVT convTime)
Defines the conversion time (sampling period). Shorter times provide faster updates; longer ones reduce noise and power consumption.
Returns value: None
tmp.setAveraging(TMP117_AVE ave)
Configures internal averaging to smooth measurements. Options include NOAVE or AVE8.
Returns value: None
tmp.setTargetTemperature(float targetC)
Calibrates the sensor to align with a known reference temperature by applying a correction offset internally.
Returns value: None
tmp.setOffsetTemperature(float offsetC)
Applies a constant offset in °C to all readings, compensating for system or placement bias.
Returns value: None
Full example
sensorConfigurator.ino
Example file for configuring and interacting with the TMP117 sensor using a command interpreter
0, 1, 2 <value>, 3 <value>) to interact with the sensor.