6.3 Sending data
In example 6.1 the board asked a website for its contents and printed the answer. That traffic went one way: the internet talked, the board listened. This example turns it around. The NULA MINI makes up a number every five seconds and sends it out to a server on the internet, and you watch each one arrive in a browser tab.
That is the half of the conversation every connected project needs. A thermometer that logs to a spreadsheet, a doorbell that pushes a notification, a plant sensor that emails you when the soil dries out: all of them are doing what this example does, with a real measurement in place of the random number.
In this documentation you will learn:
- The difference between an HTTP GET and an HTTP POST request.
- How to send data out from the board with
urequests.post(). - What a header is, and why one line of it changes how your data is displayed.
- How to catch and inspect that data using webhook.site.
- Why the server sees a different IP address from the one your board prints.
Hardware required
- 1× Soldered NULA MINI board
- 1× USB-C cable
- 1× breadboard
- A 2.4 GHz Wi-Fi network with internet access
webhook.site is a public server out on the internet, so the network has to be able to reach it. A guest network that blocks outbound connections will fail here.Putting the components together
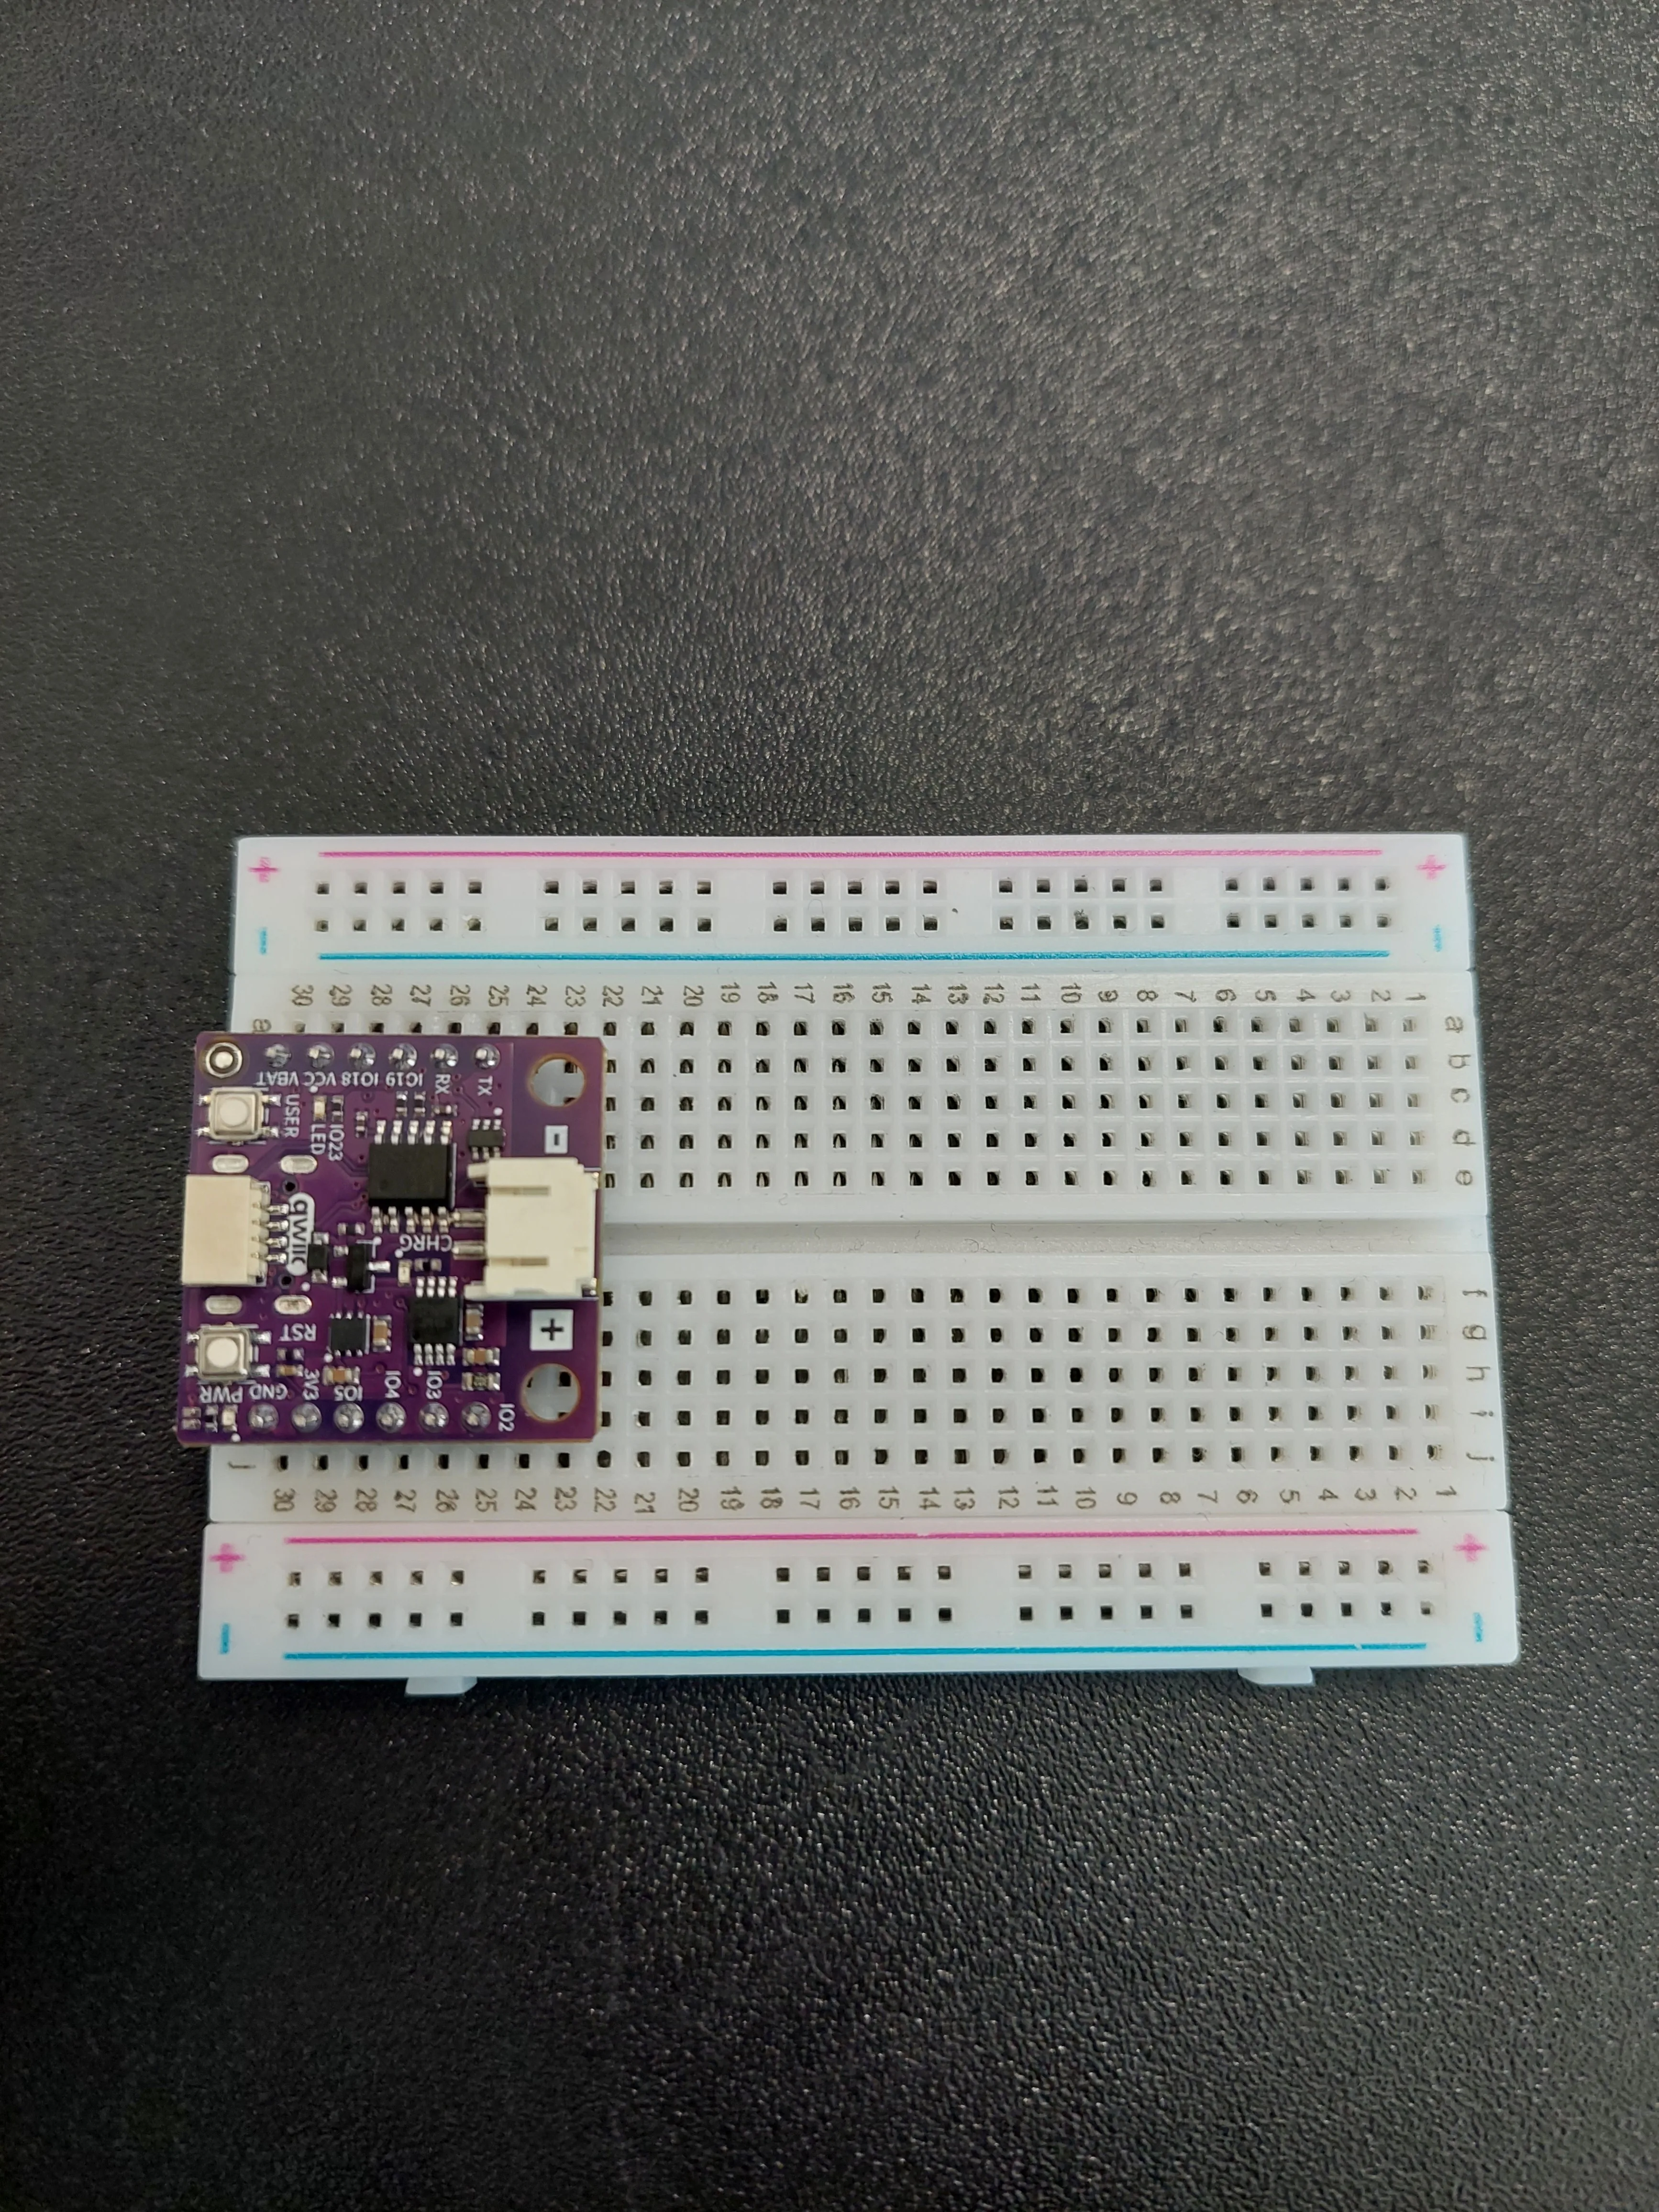
1. Insert the NULA MINI board on the breadboard
Push the board into one end of the breadboard so that its two rows of pins straddle the centre channel.
2. Connect the USB-C cable
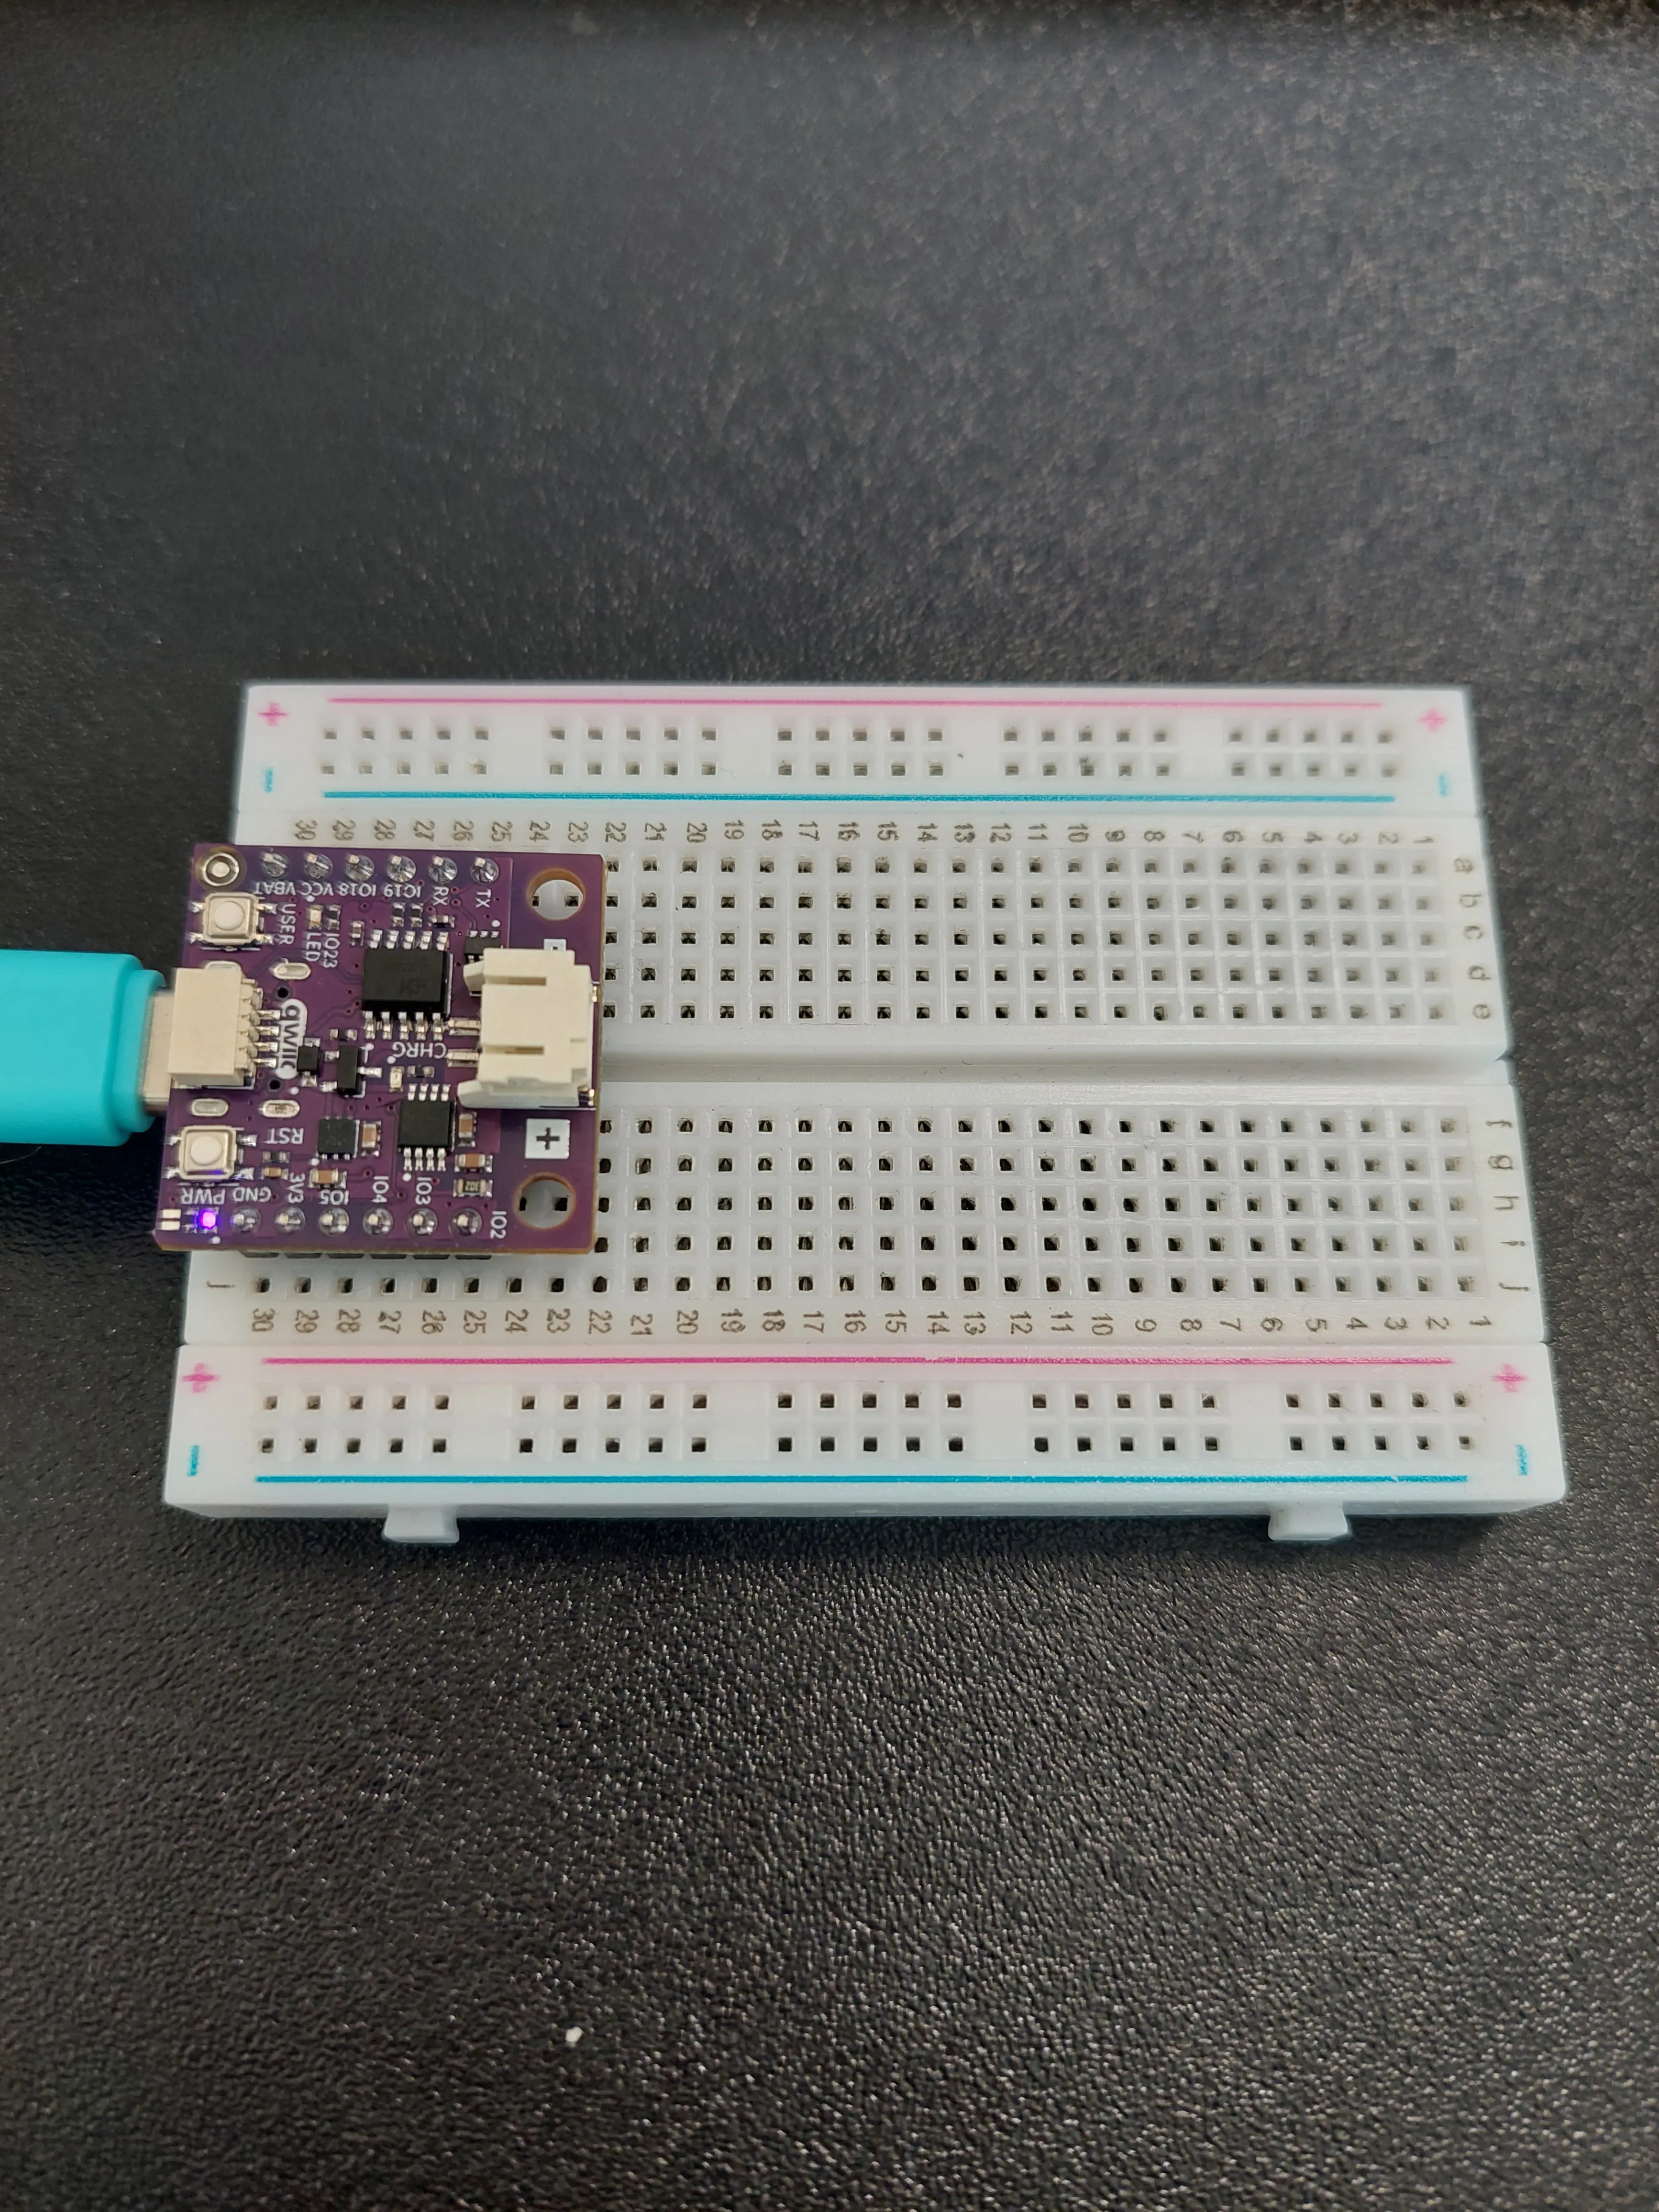
Plug the USB-C cable into the connector on the edge of the board, and the other end into your computer. The PWR LED lights up, and the build is finished.
Setting up webhook.site
Before running anything, you need somewhere for the data to go. webhook.site is a free service that hands you a web address of your own and then shows you, live, everything that gets sent to it. It saves you from having to write a server before you can test sending to one.
Open webhook.site in a browser. It gives you a fresh address the moment the page loads. There is nothing to sign up for.
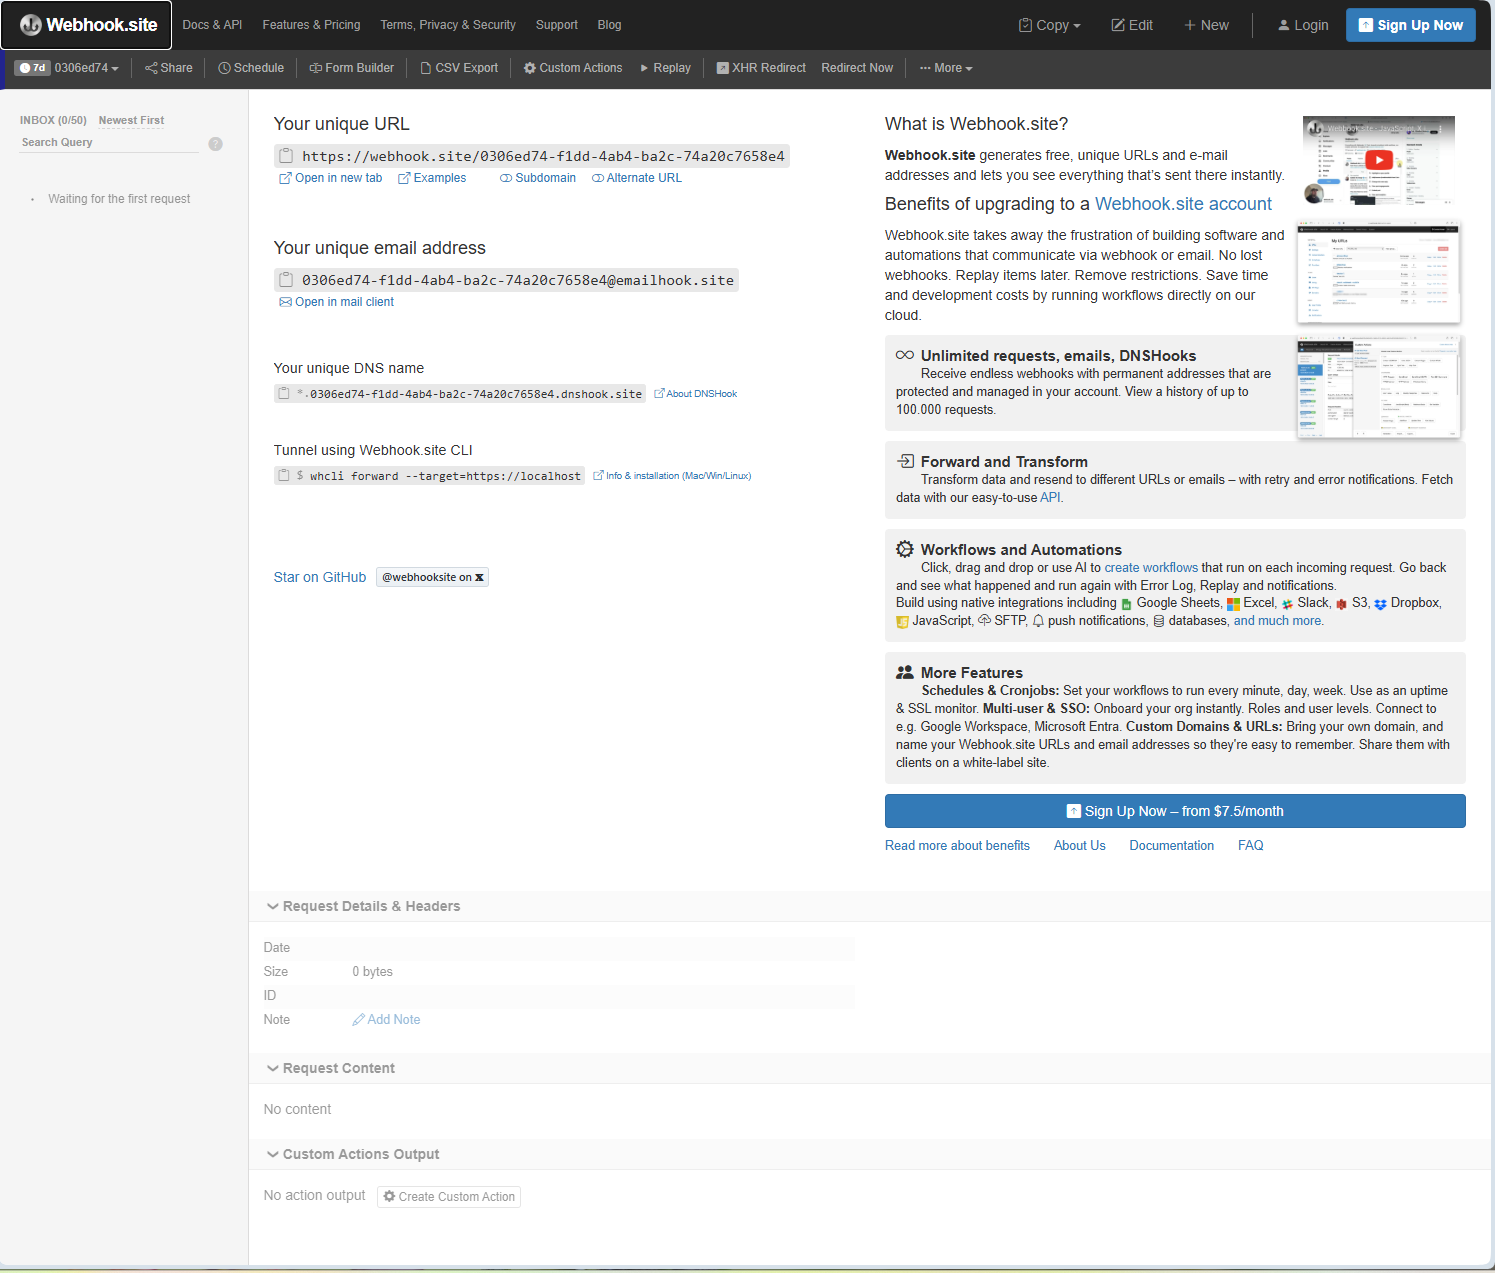
- Copy the address shown under Your unique URL. It looks like
https://webhook.site/0306ed74-f1dd-4ab4-ba2c-74a20c7658e4. The long code at the end is yours alone, and yours will be different from the one in the picture. - Paste it into the script, between the quotation marks of the
webhook_urlvariable:
webhook_url = "https://webhook.site/your-unique-id"
- Leave the browser tab open. This is the page the data will appear on, and it updates by itself, so you never need to reload it.
INBOX (0/50) while it is waiting. A free webhook.site address holds 50 requests, and this script sends one every five seconds, so it fills up in a little over four minutes, after which new requests stop being recorded. If yours goes quiet, that is almost always why. Press Stop and Run again to restart the flow, or click New at the top of the page for a fresh address with an empty inbox. The 7d badge beside the address means it is kept for seven days.https://, not http://. Unlike the Arduino HTTPClient, urequests handles an encrypted address without anything extra from you, so there is nothing to configure here, but it does need noticeably more memory while the request is in flight.GET and POST
HTTP, the language browsers and servers speak, has a handful of methods, the word at the very start of a request that says what kind of thing is being asked for. Two of them cover almost everything:
- GET means give me something. Your browser sends a GET every time you open a page. Example 6.1 sent a GET to
example.comand got a page of HTML back. - POST means here is something, take it. It is what your browser sends when you fill in a form and press submit, and it is what this example uses.
The practical difference is where the data rides. A GET request is essentially just an address, so there is nowhere to put much of anything. A POST request carries a body, a separate parcel of data attached underneath the address, and that is where our number goes.
The script builds that body as a single line of text:
post_data = "number=" + str(random_number)
which comes out as number=77, or number=80, or whatever the board just made up.
str() turns the number into text. Python will not join a number to a string with +. Try it without str() and you get TypeError: can't convert 'int' object to str implicitly. This is one of the most common small errors when you are building a message out of pieces.The name=value shape is the same one a browser uses for a simple form, and it has a name: form encoding. The server has no way of guessing which format you chose, so the script tells it, in a header:
response = urequests.post(
    webhook_url,
    data=post_data,
    headers={"Content-Type": "application/x-www-form-urlencoded"},
)
A header is one line of extra information about the request itself, rather than part of the data. The headers= argument takes a dictionary of name and value pairs inside curly braces, so you can pass several at once if you need to.
This particular header is what lets webhook.site show your number as a tidy labelled field instead of a raw blob of text, as you will see further down.
Sending on a timer, and checking the connection first
The script uses the same non-blocking timer as 5.1: time.ticks_ms() with time.ticks_diff(), so the board is never frozen waiting for the next send.
Inside that, one extra check happens before anything is sent:
if wlan.isconnected():
    # ...send the data...
else:
    print("Wi-Fi not connected. Trying to reconnect...")
    wlan.connect(ssid, password)
A Wi-Fi connection can drop at any time. The router restarts, or the board drifts out of range. Without this check the script would try to send anyway, wait for a timeout, and print an error. With it, a dropped connection instead triggers a fresh connect() attempt, and the next pass through the loop tries again.
The random number itself comes from:
random.seed(time.ticks_us())
random_number = random.randint(0, 100)
randint(0, 100) returns a whole number, and both ends are included, so 0 and 100 are both possible. seed() gives the generator a starting point, and handing it the microsecond clock means the sequence differs from run to run rather than repeating. In a real project this is where a sensor reading would go.
Code
Below is the complete code for this example:
# The network module contains everything needed to join a Wi-Fi network.
import network

# The urequests module lets us speak HTTP, the language browsers use to talk to websites.
import urequests

# The random module can make up numbers for us, which stands in for a real sensor reading in this example.
import random
import time

# These two variables hold the name of your Wi-Fi network (the SSID) and its password.
ssid = "your ssid"
password = "your password"

# This variable holds the address we send our data to. Open https://webhook.site in a browser, copy the unique link
# it shows you at the top of the page, and paste it between the quotation marks below. Keep that browser tab open
# and you will see every value the board sends appear in it.
# Example: https://webhook.site/your-unique-id
webhook_url = "your unique url"

# This variable defines how much time passes between two messages, in milliseconds. 5000 milliseconds is five
# seconds. Feel free to experiment with this value, but be aware that sending data very often is impolite towards
# whichever server is receiving it.
POST_INTERVAL_MS = 5000

# This variable remembers the moment when we sent the last message, so we know when the next one is due.
last_post = 0

# seed() gives the random number generator a starting point. Handing it the current value of the microsecond clock
# means the numbers differ after every reset, rather than repeating the same sequence.
random.seed(time.ticks_us())

print()
print("Wi-Fi POST Request Example")

# Here we create our network object and switch the Wi-Fi hardware on. network.STA_IF means the board joins someone
# else's network, the same way your phone does.
wlan = network.WLAN(network.STA_IF)
wlan.active(True)

# connect() starts the connection attempt. It does not wait for the connection to finish, so we wait for it
# ourselves in the loop below, printing one dot every half second so we can see the board is still trying.
wlan.connect(ssid, password)
print("Connecting to Wi-Fi", end="")
while not wlan.isconnected():
    time.sleep(0.5)
    print(".", end="")

# ifconfig() returns the address the router handed out to our board as its first value.
print()
print("Connected to Wi-Fi!")
print("IP Address:", wlan.ifconfig()[0])

while True:

    # time.ticks_ms() returns the number of milliseconds passed since the board was powered on. We use it instead of
    # a plain sleep so the board stays free to do other work between messages.
    now = time.ticks_ms()

    # Here we check how much time has passed since the last message. Only when POST_INTERVAL_MS milliseconds have
    # gone by do we send a new one, and we immediately remember the current time as the new starting point.
    if time.ticks_diff(now, last_post) >= POST_INTERVAL_MS:
        last_post = now

        # Before sending anything we check that we are still online. A Wi-Fi connection can drop at any time, and
        # trying to send data without one would only waste time and print errors.
        if wlan.isconnected():

            # randint() returns a whole random number, and both of the values we give it are included, so this gives
            # us a number from 0 to 100. In a real project this is where a sensor reading would go.
            random_number = random.randint(0, 100)

            # Here we build the data we are going to send. The format "name=value" is the same one a browser uses
            # when you submit a simple web form, and str() turns our number into text so it can be joined on.
            post_data = "number=" + str(random_number)

            print("----------------------------------")
            print("Sending POST request to webhook.site...")
            print("Data:", post_data)

            # We wrap the request in a try block because anything that goes over a network can fail, and without it
            # a failed request would stop the whole program with an error.
            try:

                # post() sends the request together with our data and waits for the answer. POST is the HTTP method
                # used for sending data to a server, while GET, which we used in example 6.1, is the one used for
                # reading data from it.
                # The headers we pass along describe the format our data is written in, so the server knows how to
                # read it. A header is one line of extra information about the request itself.
                response = urequests.post(
                    webhook_url,
                    data=post_data,
                    headers={"Content-Type": "application/x-www-form-urlencoded"},
                )

                # status_code is the number the server answers with. 200 means "here you go", and anything from 400
                # upwards means something went wrong. text is the body of the answer.
                print("Server response code:", response.status_code)
                print("Response body:")
                print(response.text)

                # close() releases the memory the response was using. Always close a response once you are done with
                # it, otherwise a program that makes many requests will slowly run out of memory.
                response.close()

            except Exception as e:

                # If anything went wrong, print the reason instead of letting the program stop.
                print("POST failed. Error:", e)

        else:

            # If we lost the connection, start a new attempt and try again on the next pass.
            print("Wi-Fi not connected. Trying to reconnect...")
            wlan.connect(ssid, password)

    # A very short pause leaves the processor a moment to handle its own background work.
    time.sleep_ms(10)
What you should see
Press Run. Unlike example 6.1, where everything happened once and the script ended, this one keeps going. A new block of output appears every five seconds for as long as it runs, so there is no burst to miss.
Wi-Fi POST Request Example
Connecting to Wi-Fi....
Connected to Wi-Fi!
IP Address: 192.168.75.75
----------------------------------
Sending POST request to webhook.site...
Data: number=90
Server response code: 200
Response body:
This URL has no default content configured. <a href="https://webhook.site/#!/edit/18274021-66b8-4ebf-971a-cb83c662cdb4">Change response in Webhook.site</a>.
Reading it from the top:
Count the dots to see how long the connection took. There are four here, one every half second, so this board was on the network in about two seconds. Four to six dots is the usual result, though an unlucky start can take a dozen. A row that keeps growing past twenty or thirty means the credentials are wrong or the network is 5 GHz.
Server response code: 200 is the line that matters. It means webhook.site received the request and accepted it.
Response body: is followed by a sentence that looks like a complaint, and is not one. This URL has no default content configured. is simply webhook.site telling you that you never told it what to reply with, so it replied with that. Your data still arrived. A POST is about what you send, not about what comes back, and most real servers answer with something equally uninteresting, often nothing at all.
The data arriving in the browser
Now switch to the webhook.site tab. Requests appear on their own as the board sends them.
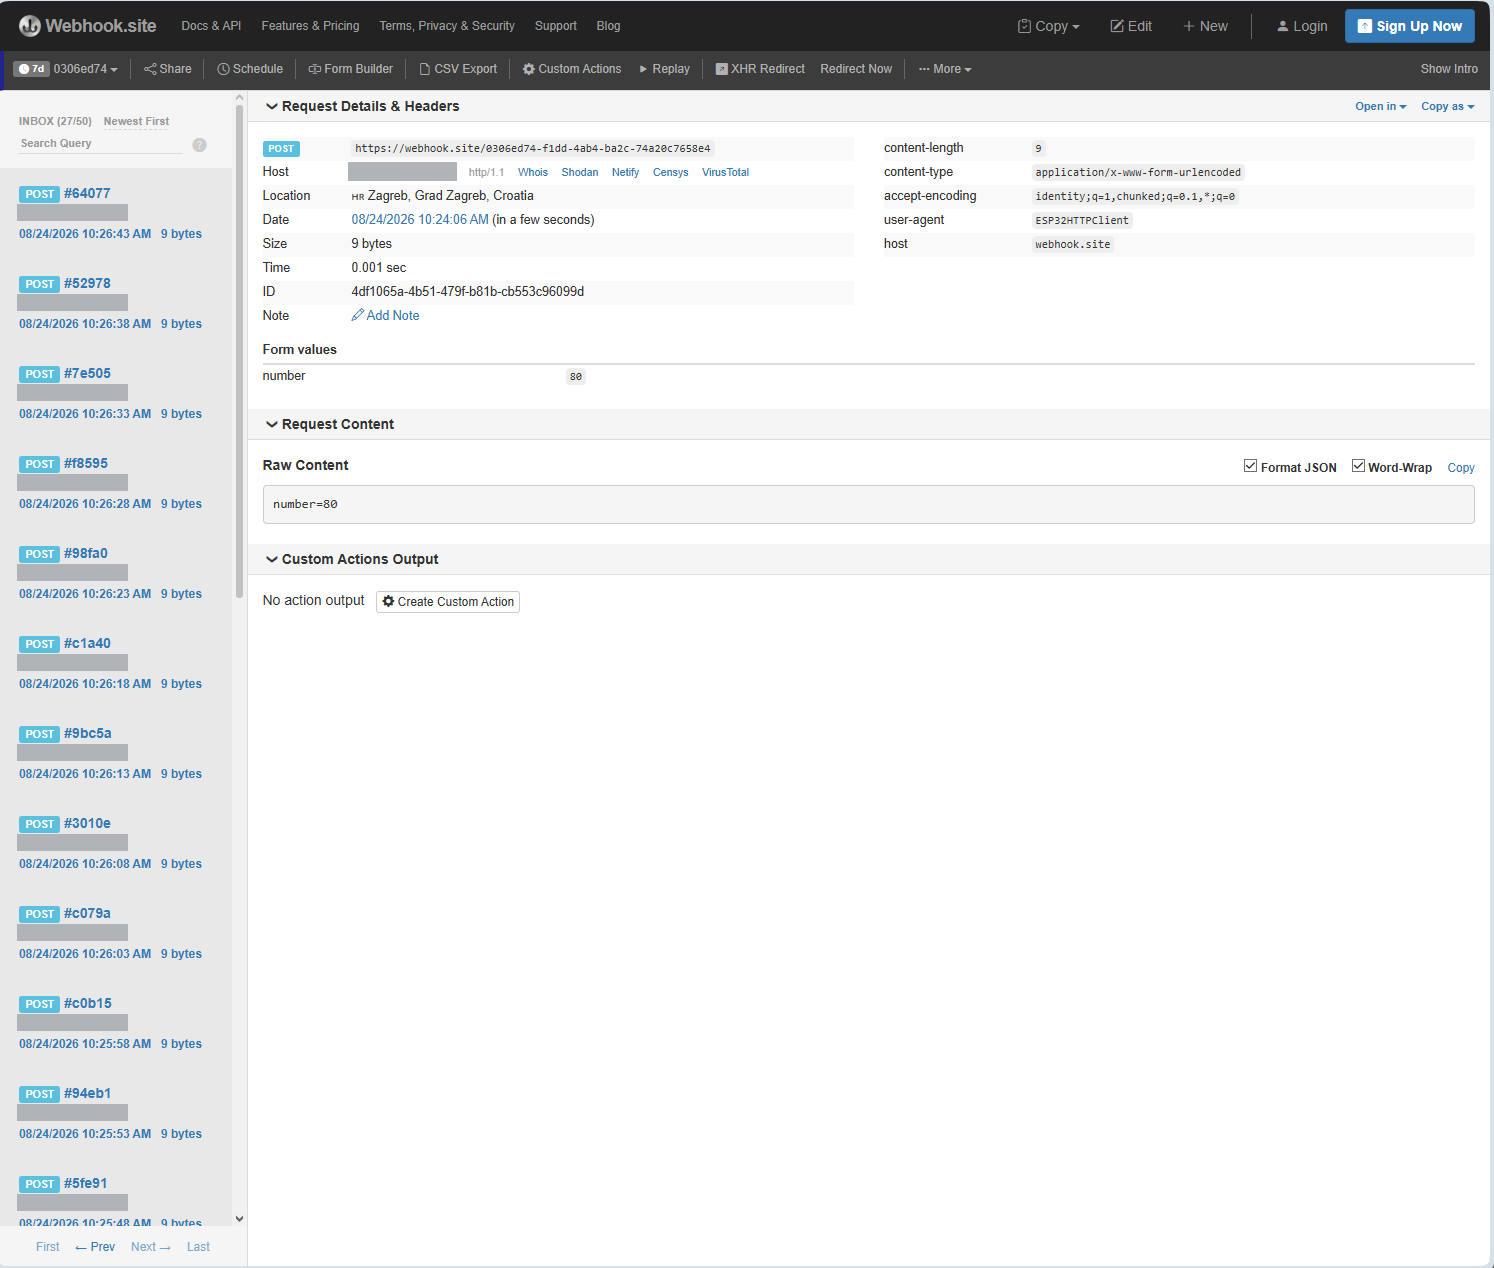
The column on the left is every request that has arrived, newest at the top. Click any one of them to open it on the right. There is a lot on this screen, and four parts of it are worth finding:
The timestamps are exactly five seconds apart: 10:26:43, 10:26:38, 10:26:33, and so on down the column. That is POST_INTERVAL_MS doing its job, and it is far better proof of the timing than the console can give you. Change the value in the script and the spacing of this column changes with it.
Form values: number 80 is your data, taken apart and labelled. This is the payoff from the Content-Type header: because the script declared the format, webhook.site knew to read number=80 as a field called number holding the value 80. Remove that header and the same bytes still arrive, but this section disappears and you are left picking the value out of the raw text yourself.
Raw Content: number=80 is that same body exactly as it left the board, before anything interpreted it. Note that it says 80 while the console above said 90. These are two different requests, each carrying its own freshly made-up number.
9 bytes, on every row. That is the whole message: seven characters of number= plus two digits. A single-digit number would show as 8 bytes. It is worth pausing on how little data this is next to the kilobyte of HTML that example 6.1 pulled down.
Host address is not the address your board printed. The console said IP Address: 192.168.75.75, but the request arrived from something entirely different (blanked out in the picture above). Neither is wrong. 192.168.75.75 is the address of the board inside your own network, handed out by your router and meaningless anywhere else. Every example so far has printed one of these. When the request leaves for the internet, your router swaps that private address for the single public one your whole household shares. So webhook.site sees your router, not your board, which is also why the Location line names a city near you rather than your desk.If it does not work
- Dots that never stop. The credentials are wrong, or the network is 5 GHz, or the router is out of range. Check the SSID and password for capital letters and stray spaces.
Server response code: 200in the console, but nothing in the browser. Either the address inwebhook_urlis not the one the open tab is showing (check the long code at the end character for character), or the inbox has hit its 50-request limit. Click New for a fresh address.- Requests arrive for a few minutes and then stop. That is the 50-request limit. The board carries on sending and still gets its
200; webhook.site has simply stopped recording. POST failed. Error: -2. The board is on the network but could not look up the address, which usually means the network has no working internet connection. A guest network blocking outbound requests looks the same.POST failed. Error: [Errno 12] ENOMEM. The board ran out of memory mid-request. Anhttps://address needs a good deal of it, so this is the one to expect if you add much more to the script.POST failed. Error: need more than 1 values to unpack. This is what you get if you never replaced"your unique url"with your own address. The message does not mention the URL at all, which makes it a hard one to guess at:urequestsis trying to split the address at the://that separateshttpsfrom the rest, and a line of ordinary words has nothing to split on. Paste your webhook address in and the message goes away.
Full example
Check out the full example code on the link below:
6.3_Sending_Data.py
Example that shows how to send data from the NULA MINI board to a server on the internet using an HTTP POST request, and how to watch it arrive on webhook.site.